DIGITAL PHOTOGRAPHY & IMAGING - PROJECT 2

Rifath Ali (0335738)
Digital Photography & Imaging
Project 2
INSTRUCTIONS
Project Brief
This project consists or two parts. Project
2A; Photo Manipulation and Project 2B Animated Still. For Project 2A we were
asked to create a surrealist photo. The image needs to be surreal yet realistic
enough for the eyes. Project 2B was about bringing the surreal image we created
into life. We were asked to use Adobe Photoshop and Adobe Aftereffects for this
project.
PROJECT 2A: Photo
Manipulation
04/10/2019 – 11/10/2019 (Week 6 - Week 7)
First, we were asked to sketch our ideas
for the surreal photo. I wanted to create an image with an environmental awareness
message. My idea was to have a whale soaring in the sky and a person sinking in
the ocean. The switched perspective of soaring and sinking of the main subjects
are used to bring surrealism to the image. For further detail, I covered the
persons face with a plastic bag and filled the belly of the whale with plastic
waste. This is to create awareness on plastic wastage and how it affects
everyone.

Following are the images I used for this
project.

Fig. 1.02: Sky Background, Taylor Van
Riper, Unsplash

Fig. 1.03: Underwater 1, Cristian Palmer,
Unsplah

Fig. 1.04: Underwater 2, Jeremy Bishop,
Unsplash

Fig. 1.05: Underwater 3, Jeremy Bishop.
Unsplash

Fig. 1.06: Underwater 4, Sebastian Pena
Lambarri, Unsplash

Fig. 1.07: Orca, Clker-Free-Vector-Images
/ 29587, Pixabay

Fig. 1.08: Person Falling, Sandis Helvigs,
Unsplash

Fig. 1.09: Person with Plastic Bag, Daniel
Chekalov, Unsplash

Fig. 1.10: Plastic Bag 1, Adam Muise,
Unsplash

Fig. 1.11: Plastic Bag 2, Paul Bence,
Unsplash

Fig. 1.12: Plastic Bottle, Freepik

Fig. 1.13: Trash, Freepik

Fig. 1.14: Plastic Trash, Freepik
First, I created the background using
three different images. I brought them to the canvas and created a layer mask
to hide the areas I didn’t need.

Fig. 1.15: Background; Sky

Fig. 1.16; Background; Sea Level

Fig. 1.17: Background; Underwater
I imported the image of the person falling
and the person with the plastic bag over the head. I created a layer mask on
the person with plastic bag, leaving just the head. Then I overlapped both the
images and matched the color to the underwater background. I carefully adjusted
the mask on the plastic bag covered head to make it look like it’s the same image
as the person drowning. I adjusted the blending mode and opacity as well.

Fig. 1.18: Imported and mask created; Person
falling & Person with plastic bag

Fig. 1.19: Overlap & Match Color

Fig. 1.20: Mask adjustment
Next, I imported the image of the orca and
duplicated the later to separate the black and white. I wanted to create a look
where inside of the orca is filled with water. I used Bevel & Emboss, Inner
Shadow and Inner Glow from the Layer Style to make it loo like the whale was glass/transparent.
Then I imported two other underwater images to fill up the inside of the orca. I
added several layers of plastic materials to fill up the water with trash. Each
of these layers had their own masks and their color was matched to the water.

Fig. 1.21: Orca; Black & White separated
into two different layers

Fig. 1.22: Layer Style adjustments to
create transparent glass effect

Fig. 1.23: Filled up with underwater image
and plastic trash added for details
To finish up the image, I clipped the trash
layer to the orca and used cloud brush presets to balance out the sky.

Fig. 1.23: Final Image; Save The Oceans


PROJECT 2B: Animation
11/10/2019 – 18/10/2019 (Week 8 - Week 9)
In order to create the animation for the
image, Mr. Jeffry showed us a tutorial on how to use Adobe After Effects. Firs,
I created a new composition based on the resolution of the previous photo
manipulation. I set the duration of the animation to five seconds. I imported
the photoshop file to this new AE file as a composition so that I can adjust layer
by layer.

Fig. 1.24: New Composition

Fig. 1.25: Import PSD File
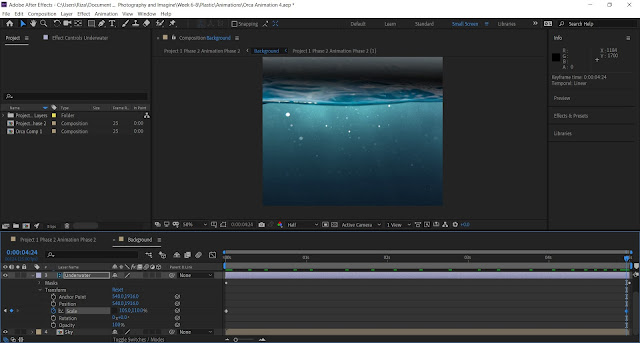
First, I decided to animate the larger layers.
So, I started off with the underwater layer. As I wanted the bubbles to rise up
and expand to give more depth to the animation, I created a keyframe with the Scale
adjusted. I placed the adjusted keyframe at the end of the timeline. I applied
the same transformation to the sea level layer to give it movement. But instead
of the water rising-up, I made the transformation horizontal.

Fig. 1.26: Underwater; Scale Transformation

Fig. 1.27: Sea Level; Scale Transformation
Next, I moved on to the person drowning.
As I needed him to move downwards, I simply used Position Transformation. Then I
moved that keyframe to the end of the timeline. I also wanted to give a bit of
an organic movement to the body. So, I used puppet tool and made another
keyframe to bring the movement.

Fig. 1.28: Drowning; Position Transformation

Fig. 1.29: Drowning; Puppet Mash Effect
After that I added animation to the clouds.
I Simply used Scale Transformation to make them move to one side.

Fig. 1.30: Clouds; Scale Transformation
The remaining was to animate the Orca. I
had to pay close attention to detail when doing it. Just like at the beginning,
I animated the underwater layers first. Although this time I wanted to bring a
bit of a rotation effect to the orca, I applied the same transformation values
to the underwater layers as well.

Fig. 1.31: Sea Level; Scale & Rotation
Transformation

Fig. 1.32: Underwater; Scale &
Rotation Transformation
To animate the plastic trash inside the orca,
I applied Position Transformation adjustments to each layer separately. This is
to make it more natural as objects differ in density.

Fig. 1.33: Plastic Trash; Position Transformation
As the water is only in the black areas of
the orca, I didn’t want any of the plastic trash to move on top of the white
areas. So, I created two later masks to make sure nothing moves out of the
black areas. I used pen tool to create the layer mask.

Fig. 1.34: Plastic Trash; Mask
For the last effect, I needed to bring
some movement to the orca itself. So, I used Puppet tool to bring some subtle movement.
Next, I applied Rotation Transformation adjustments to the orca.

Fig. 1.35: Orca; Puppet Mash Effect

Fig. 1.36: Orca; Rotation Transformation
In order to export the file, I added it to
Adobe Media Encoder queue. As instructed in class, I chose H264 as the video
format and rendered it.
Fig. 2.37: Final Animation; Save The Ocean
Comments
Post a Comment